Storing custom data into InDesign file via XMP
 Storing data within InDesign document is possible with insertLabel() but there is another place to save information about document. As we know, all InDesign documents have metadata stored in file itself. For more info take a look at other Metadata related posts listed at the end.
We are able to insert our own data into Industry standard namespaces, but also we can create our own namespace, and insert data into it. We will go through few examples. So, let’s start! 🙂
Storing XMP data into predefined namespaces
First, let’s take a look how to store data into Industry standard namespaces. Thing we need is a list of namespaces, win URI-s. List can be found here: Extract Metadata with Adobe XMP [Part 2] in table. We can insert single values, or we can create container (Array) with multiple values in one node.
This will insert value into Basic XMP schema:
var myDocXMP = app.activeDocument.metadataPreferences;
var destNamespace = "http://ns.adobe.com/xap/1.0/";
var destNodeName = "MyTesting";
var nodeValue = "IndiSnip test value";
myDocXMP.setProperty(destNamespace, destNodeName, nodeValue);
Great! We have inserted our custom data into XMP. Now, let’s take a look how to insert container:
var myDocXMP = app.activeDocument.metadataPreferences;
var destNamespace = "http://ns.adobe.com/xap/1.0/";
var destContName = "IndiSnip";
myDocXMP.createContainerItem(destNamespace, destContName, undefined, ContainerType.BAG);
Now, when we have container, we can insert data into like this:
var myDocXMP = app.activeDocument.metadataPreferences;
var destNamespace = "http://ns.adobe.com/xap/1.0/";
var destContName = "IndiSnip";
myDocXMP.setProperty(destNamespace,destContName+"[1]", "Data 1");
myDocXMP.setProperty(destNamespace,destContName+"[2]", "Data 2");
myDocXMP.setProperty(destNamespace,destContName+"[3]", "Data 3");
And it looks like this:
There are three types of containers. For more info take a look into XMP Specifications. (link can be found in Extracting Metadata with Adobe XMP [Part 2])
Storing XMP data into custom namespaces
To store XMP into custom namespace, we have to use append() method from metadata Class. One downside is that we can’t pass String containing XML, instead, we need to pass XML file containing xmpmeta nodes. I have extracted XMP from actual file and stripped all unnecessary nodes. Save this to new file and name it ‘myTestXMP.xml’.
<x:xmpmeta xmlns:x="adobe:ns:meta/">
 <rdf:RDF xmlns:rdf="http://www.w3.org/1999/02/22-rdf-syntax-ns#">
  <rdf:Description xmlns:IndiSnipXMP="https://indisnip.wordpress.com/">
   <IndiSnipXMP:creator>IndiSnip</IndiSnipXMP:creator>
   <IndiSnipXMP:website>https://indisnip.wordpress.com/</IndiSnipXMP:website>
   <IndiSnipXMP:e-mail>indisnip@gmail.com</IndiSnipXMP:e-mail>
  </rdf:Description>
 </rdf:RDF>
</x:xmpmeta>
All we need now is code that will insert this into our file: Our file is stored on root of C drive (PC)
var myXMLfile = File('/c/myTestXMP.xml');
app.activeDocument.metadataPreferences.append(myXMLfile);
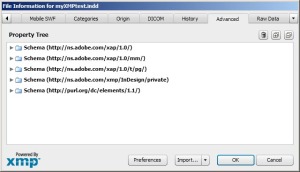
And here is the result:
If we are building script for client, and we want to insert custom XMP into file, we can also create temporary XML within the script, save it to file, append XMP and delete temp XML file after data is inserted:
var myXML = new XML("<x:xmpmeta xmlns:x=\"adobe:ns:meta/\"><rdf:RDF xmlns:rdf=\"http://www.w3.org/1999/02/22-rdf-syntax-ns#\"><rdf:Description xmlns:IndiSnipXMP=\"https://indisnip.wordpress.com/\"><IndiSnipXMP:creator>IndiSnip</IndiSnipXMP:creator><IndiSnipXMP:website>https://indisnip.wordpress.com/</IndiSnipXMP:website><IndiSnipXMP:e-mail>indisnip@gmail.com</IndiSnipXMP:e-mail></rdf:Description></rdf:RDF></x:xmpmeta>");
var myXMLfile = File('/c/myTestXMP.xml');
if ( myXMLfile.open('e') ){
   myXMLfile.write(myXML);
   myXMLfile.close();
   app.activeDocument.metadataPreferences.append(myXMLfile);
   myXMLfile.remove();
}
Once we have inserted our custom namespace, we can insert our data like this:
Single node
var myDocXMP = app.activeDocument.metadataPreferences;
var destNamespace = "https://indisnip.wordpress.com/";
var destNodeName = "MyTestingNode";
var nodeValue = "IndiSnip test value";
myDocXMP.setProperty(destNamespace, destNodeName, nodeValue);
Array node
var myDocXMP = app.activeDocument.metadataPreferences;
var destNamespace = "https://indisnip.wordpress.com/";
var destContName = "MyTesting";
var nodeValue = "IndiSnip test value";
myDocXMP.createContainerItem(destNamespace, destContName, undefined, ContainerType.BAG);
myDocXMP.setProperty(destNamespace, destContName + "[1]", "I deleted all paragraphs");
myDocXMP.setProperty(destNamespace, destContName + "[2]", "Inserted image (edit)");
myDocXMP.setProperty(destNamespace, destContName + "[3]", "Inserted image IMG_3895.JPG");
Storing XMP data into custom namespaces (ExternalObject)
At the end, I want to show you how to insert XMP metadata without opening destination file. It can be done just through External Object AdobeXMPScript. We can use this method to insert XMP into other file types too. (Illustrator, Photoshop, ets.) For this method, we don’t need external XML file because we are going to create namespace directly in XMP. For more info read comment lines)
// load XMP Library
function loadXMPLibrary(){
    if ( !ExternalObject.AdobeXMPScript ){
        try{ExternalObject.AdobeXMPScript = new ExternalObject('lib:AdobeXMPScript');}
        catch (e){alert('Unable to load the AdobeXMPScript library!'); return false;}
    }
    return true;
}

// select destination file
var myFile = File.openDialog("Select destination file", "InDesign:*.indd", false);

// check library and file
if(loadXMPLibrary() && myFile != null){
    xmpFile = new XMPFile(myFile.fsName, XMPConst.FILE_INDESIGN, XMPConst.OPEN_FOR_UPDATE);
    var myXmp = xmpFile.getXMP();
}

if(myXmp){
    var destNamespace = "https://indisnip.wordpress.com/";
    // define new namespace
    XMPMeta.registerNamespace(destNamespace,"IndiSnipXMP");
    // insert nodes
    myXmp.setProperty(destNamespace,"creator","IndiSnip");
    myXmp.setProperty(destNamespace,"e-mail","indisnip@gmail.com");
    myXmp.setProperty(destNamespace,"web_site","https://indisnip.wordpress.com");
    myXmp.setProperty(destNamespace,"Version","1.0b");
    // put XMP into file
    if (xmpFile.canPutXMP(myXmp)){xmpFile.putXMP(myXmp);}else{alert("Error storing XMP");}
    // close file
    xmpFile.closeFile(XMPConst.CLOSE_UPDATE_SAFELY);
}
I hope you enjoyed this little journey through XMP 🙂 As I promised, here are links where you can find more info about XMP:
- Extract Metadata with Adobe XMP [Part 1]
- Extract Metadata with Adobe XMP [Part 2]
- Extract file preview stored in Adobe XMP data
- Fill InDesign XMP info from document content
Also, don’t forget to check Adobe XMP documentation for more info!
So, that’s it!
Have fun! 😀


 IndiSnip on Twitter!
 IndiSnip on Facebook!
 Contact IndiSnip by e-mail!

Excellent !!!!
I was one hoping to find that kind of stuff, will keep it aside for some later use 😉
Thanks Loic! 🙂
That is fantastic, thanks! I work in Applescript but the principals are the same. I was especially needing to add my own namespace, and this article helped me a lot!